Please feel free to browse my blog, however as I have designed my cards personally the designs and images on this site are for inspirational purposes only. Thank you for your understanding
Wednesday, November 2, 2011
Continuing to learn letterpress
I was able to complete the Letterpress II class!!! I was very surprised at the amount of information I had retained from the first class. I had so much fun coming up with the design and mixing the ink. When it comes to the ink a little definitely goes a long way!
Realising how finicky the press can be and made me, once again, be in awe of how large projects were produced on the letterpress in the past. Flexibility is a must when it comes to design and I have to be willing to make mulitple adjustments to the press in order to produce an evenly inked print that can be used.
I am pleased with the thank you cards I produced. It was great to see how different the same design looked on paper of different textures and colors. I was excited about the combination od a polymer plate design and lead type. I'm looking forward to designing my next letterpress project.
Sunday, July 24, 2011
Learning how to use a press
Backspace, delete, save and spell check are used with frequency whenever I type something on the computer. I admit I have taken them for granted. However, I now have a deeper appreciation for them since taking my first letter press class at the San Francisco Center for the Book. I had to put together two, short lines, yes two, and I was very conscious of having to focus on all the elements necessary to compose the lead type so it could be printed on a page! I had the opportunity to mix ink, ink up the press, and position the text for printing, which comprised of many different steps.
I am in awe of the men and women who did this for a living printing large amounts of text such as a newspaper or a book. I have to admit I really enjoyed learning this process and cannot wait to start incorporating letterpress into my designs.
Friday, July 8, 2011
The Art of Type
In addition to carefully selecting the image on one of my cards I love to find just the right style of words (the type) that complements that image. Two styles I always admire are calligraphy and letterpress. I have decided that I would like to learn both!
I remember my Dad bought me my first fountain pen, which I had to fill from a bottle of ink. We had to learn cursive writing in school. I still incorporate some loops into my handwriting but it is my own variation of what I was taught. I purchased a calligraphy starter set which included some exercises. The key is practice but I want to learn the fundamentals from an expert. One day it would be nice to be able to offer the service of addressing envelopes for wedding invitations I have made.
Many years ago I was given the drawer pictured here by a friend. He suggested I use it to display my rubber stamps. At the time I had no idea what it had previously been used for. I now know it is a job case used to arrange font for letterpress, most likely upper case. Letterpress- type images can be produced by computer but there is nothing like the real thing, created by connecting ink to paper by heavy machinery. Letterpress is not limited to text. Modern technology lends itself to custom design plates being made easily for use in an old fashioned letterpress. I am lucky enough to live in an area where I can take classes to learn letterpress. Apparently I'm not the only one eager to learn because I have been wait-listed for the two classes I am interested in taking ! Who said it was a dying art?
Labels:
calligraphy,
handmade cards,
letterpress,
Wedding invitations
Tuesday, June 21, 2011
Sweet 16!
I love looking at paper and imagining the sheet fashioned into an envelope or playing the starring role in one of my cards. When I picked up the sheet of paper with the shiny brown background, and the foreground strewn with balloons, I knew I would use it for a special card. I scoured the shelves in Michaels but it was the only sheet like it.
I was really touched when I received the call from a lovely young lady inviting me and my sons to her sweet 16 party. Imara is a special to us and therefore deserved a very special card. I knew I had the perfect sheet of paper to fit the bill. Once again I used my Accucut Grandmark machine and dies, vellum, Bazzill cardstock, a purchased die cut balloon, some ink and rubber stamps to create a card befitting a 16 year old.
I told Imara her card was truly bespoke because even if I used the same design for future cards they would never be made with that paper. She said that made her feel special and that made me feel sooooo happy to be able to do that with one of my cards!
Saturday, June 18, 2011
Wedding Fever
I had the honor of being asked by another friend to make her wedding invitations. She lives in Barbados and is getting married there so a lot of the communication re: design was done via email. It was truly a labor of love as we have been friends since we were teenagers.
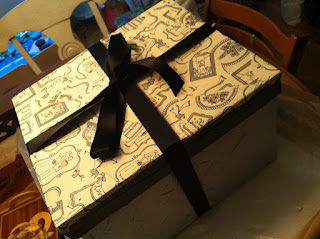
Between my Accucut Grandemark, computer and laser printer, I created the invitation, a folder and card with additional information. I purchased envelopes and then made the envelope liners. Presentation is key so I took the paper scraps and covered a box to package the invitations. I produced a final product I was very pleased with. Congratulations Deb and Andrew!
Saturday, April 30, 2011
I Love My Gadgets
My embroidered Adinkra symbol cards have been in recent demand. I love gadgets and am able to use my computer, embroidery machine and Grandemark machine by Accucut to produce this card. When I originally designed my card I had to handcut a 12x12 piece of paper to produce 3 flaps and a window. It was obviously doable but time consuming to ensure each cut was accurate.
When I got my Grandemark I purchased a custom die from Accucut which produced the same style card in a fraction of the time. I also use the die cut machine to make coordinated envelopes. I now can spend more time designing and bring my ideas to fruition quickly!!!
Sunday, April 17, 2011
A card for a special little boy
My son was six last month and I wanted to give him a special card. Following my Copic Marker class I was itching to work on my skin tones, using blending and shading, with the markers. He was very pleased with the finished product and recognized the little boy as himself!
Subscribe to:
Posts (Atom)